Thursday, November 01, 2012

I've moved!

Hey followers!

Check me out at my new blog: 
Sufficient Grace!


It's been a fun run for the past two-and-a-half years here at Tailor-Made.
I hope you'll continue to follow and support me at my new place.

-Taylor

Friday, October 05, 2012

Going Forward

Lately, I've been sensing a need to write.  It's something that God has laid on my heart and one that I keep getting away from in the busyness of life.  Every time I hit any momentum, something big happens (i.e. getting pregnant or having a baby) to draw my attention away.

The first step I'll be taking is returning this blog to a more writing-based outlet, rather than crafts.  I'm still going to craft, and I'll still (hopefully) share them on here occasionally.  But it honestly overwhelmed me, trying to remember to take pictures and everything.  Once I finished a project, the last thing I felt like doing was editing pictures and writing about it!  Hence the reason I haven't posted in a million years.

In any case... I will be writing more:  sharing more family anecdotes and giving voice to my thoughts going forward.  Ideally, I'd like to get back to posting once (or more) a week as I have time, but we'll see where that goes!

Thanks, all, for sticking with me!

Tuesday, July 17, 2012

Beach Vacation

Last week, my little family drove eight hours in the car to Dauphin Island, Alabama, to spend the week with my husband's family.

While the week was anything but relaxing (apparently my kids think "beach vacation" is code for "wake up two hours earlier than usual"), it was refreshing to have no responsibilities for a little while.

Wait, who am I kidding?? No responsibilities?? I took my two biggest responsibilities with me, haha! But I digress. It was, nevertheless, refreshing to spend time with family and read, and sit on the beach and read, and take pictures...

Yeah. I took pictures. Shocking, I know.

So here are some of the highlights from our first family vacation!


1. Cousins.  2. Beach baby.  3. Typical picture of my kids (Hallie loved the beach, if you can't tell).  4. Hallie kissing her cousin.  This happened all week.  


1. Daddy coaxing Gabriel into the surf.  2. Sand castle that hubby and I built together.  I call it Cair Paravel. -nerd-  3. Daddy bringing the sand to Gabriel who, up until this point, hated it.  Look at that smile!  Way to go, Dad!  4. Gabriel witnessed (and tasted) the huge speckled trout that Daddy caught.  It was delicious!

Thursday, June 28, 2012

My Mantle

The past few weeks months, I've been working on getting my living room decorated.  I'm one of those people who has a hard time getting abstract, theoretical ideas into concrete results.  And when it comes to decorating, I'm even worse than usual.  I don't know why.

Confession:  I never had a nursery ready for either of my kids.  Am I a terrible mom or WHAT?!

Just to give you an idea of how slow I am, I've been working at decorating this 1750 sq. foot apartment for almost a year.  Yes.  A year. I started with the easy projects:  the bathrooms.  Both kids' rooms are far from finished and the same is true for my room.  But hey, all three bathrooms look great. :|

Anyway, the living room is finally coming together.  YAY!  I'm so proud of the work I did, even if it wasn't very much.

Let's start with the mantle, shall we?

Monday, June 25, 2012

Onesie Projects

So... this has been sitting in my drafts folder since, like, April. I finally got around to taking pictures. :|

I've been playing around with some of Hallie's onesies and my Silhouette machine lately.  The main reason I haven't posted any of the crafts I've done is because somehow my mom brain forgot to take any and all pictures.

Sometimes I wonder how I remember to eat.  Oh wait, I occasionally forget that, too.

But I digress.

Here are some pictures of the finished onesies.  I don't have the processes laid out for you, but they're pretty simple.

Monday, June 18, 2012

A failed blogger...

That's me.  What?

My life has been the definition of crazy for the past month and a half.  I actually did start -- and finish! -- some projects, but I have not had chance to blog to save my life.  Between having family in town, traveling, more family, more traveling, and more family, I haven't had a spare moment to myself.  And we travel again in a few weeks! -sigh-

In any case, I'm going to attempt to update with the few projects I've completed over the last few weeks.  I've had one post sitting in my drafts since like April because I keep forgetting to take pictures. Go figure.

Stay tuned to check out what I've been up to!

Tuesday, May 01, 2012

My 'Poo Free Experience

Well, friends, after two months of attempting using baking soda to cleanse my hair, I have all but decided to go back to using the evil shampoo bottle.

The first month, I loved it.  My hair was a little more oily than I was used to, but it didn't really bother me, because it still felt clean.  But once I got into the second month, my hair just felt dirty.  I washed it more frequently.  I used more baking soda.  I used less of the lemon juice "conditioner."

Nothing helped.  It got to where I couldn't even wear my hair down.  (Not that I do that very often; it's hard enough to find time to shower with two kids, much less actually do my hair.)

Saturday, I washed my hair with shampoo.  My hair feels clean again!  Ahhh!

SO... if anyone has any advice on what I should do, I would welcome it!

Otherwise... I'm putting 'poo in my hair again. :p


Friday, April 20, 2012

New look!

One thing about me: I love Photoshop.

As a result, my blog look will probably change frequently, so you might want to get used to it. ;)

This layout features my two favorite colors:  dark red and tiffany blue.  It's also clean and simple, which I love.  And the fonts... I'm kind of obsessed with fonts.  I had fun with these!

Still working on fixing little bugs here and there, so bear with me! :)

Wednesday, April 18, 2012

Bippity Boppity BUTTER!


Apologies for the lack of posts the last few weeks!  We've been battling diarrhea and RSV in our house.  Fun.  I've started like five different projects, but haven't finished them.  Obviously I can't post an unfinished project. LOL.

But anyway.  Today I made butter.

Yes, butter.

And no, I don't have a churn.  But I do have a KitchenAid mixer!

I got the idea from my brother-in-law who made some over Easter week.  When he told me how easy it was, I knew I just had to try it.  It's not cheaper than buying butter from the store, but it's more about the fun of making it, I think. ;)

All you need is heavy whipping cream... and salt, if desired (I didn't use any).


Pour the cream into the mixer and let it go on 'whipping' speed.  It'll make whipped cream pretty quickly, but let it keep going.  


Pretty soon (maybe like 8-10 minutes in), you'll hear the mixture start sloshing around and you'll see the has butter separated from the buttermilk.  And here is where I failed with the picture-taking. :|

Drain off the buttermilk.  You can save it, but I didn't.  I should have, but I just didn't.  Another fail, I guess.  Knead the butter to get rid of the rest of the buttermilk.  Then I rinsed the butter, kneaded some more, and repeated a few times.


See how pretty and yellow it is?  After it was finished being kneaded to death, I stuck it in the fridge.  And washed my hands.  So greasy!

-sigh- I wish I had some fresh homemade bread to slather it on... but I don't. :/ Guess I'll have to settle for the store-bought type.

(Post title is an inside joke in my hubby's family, adapted from Jim Gaffigan.)

Tuesday, March 13, 2012

SoverM Week

SoverM.  Sisters over Misters.

That was the theme of the week I spent with my three sisters.  Poor hubby! ;)

Don't worry, we had lots of fun with him, too, getting my sisters hooked on Downton Abbey (his idea)!

Here's a quick post about our week together.

We made scarves following this tutorial found -- where else? -- via Pinterest.  We didn't use old t-shirts, but purchased some cute tanks from Wal-Mart for less than $4 a piece!


We did Bible studies.  One of my sisters taught a little bit about what she'd learned in a lesson from Beth Moore's Mercy Triumphs study on the book of James.  We told her that she was going to be the next Beth Moore.


We did watched this one do crazy things like hoola hooping in Wal-Mart.


We cooked.  A lot.


We made awesome SoverM t-shirts using my Silhouette and freezer paper.  They turned out awesome, as you can see!  (Also found these shirts at Wal-Mart for around $5 each.)


My son got a much-needed haircut from his hairdresser auntie.

 The same auntie made something special for Hallie-girl's room. :)


And, of course, we hung out.  Talked.  Listened to music.  Watched Downton Abbey.  Instagram-ed (obviously). Talked some more.

And Gabriel and Hallie got to know their aunties better. <3

Friday, March 02, 2012

Happy March!

Happy March, y'all!

March is my favorite month -- birthday and wedding anniversary!

Yesterday, I made chocolate chip banana bread.


Gabriel and I ate about half a loaf together after it cooled a bit.  Oops!

On Sunday night, three of my sisters are flying in for a girls week.  I couldn't be more excited!  The last time we did this was like four years ago!


Look how young we are! :O

I've got lots of fun crafts planned for this month... so stay tuned! :)

Friday, February 24, 2012

Car Love Shirt

I've been searching for something cute to make for my little man that would be easy and fun and Dad-approved. (Ha!)

When I came across the Car Love Shirt by Polly at Helping Little Hands, I knew I'd found it!  Plus, I'd been wanting to try out freezer paper stenciling for a long time.

I wanted to make the shirt in time for Valentine's day, but I had trouble finding a plain shirt.  Finally, I had to buy one at Walmart that had a pocket on it and make use of my handy seam ripper to take it off.  I freaking love that little tool!

Oh well, it's not really that Valentine-y of a shirt -- one of the reasons it's Dad-approved! (I did get the shirt a size bigger in hopes that he can wear it next V-day, though!)

Polly provides stencils to cut out with her tutorial, but I really wanted to use my Silhouette, so I imported her heart shape and bought some of Echo Park's adorable car shapes from the Silhouette store.  I had a lot of fun designing it. :D


Then I cut the shapes out separately (the heart, then the cars) and ironed them on.


The freezer paper was curling, but it still stuck beautifully.


I thought I would be saving myself some work by using the Silhouette to cut out the car shapes... and I suppose I did, but only a little.  It took forever to pull all the little wheels off!

Finally I got them all ironed on.  Looks pretty cute already, doesn't it?


I picked up some acrylic paint from Walmart to do this project, which is what Polly used in order to get the distressed look.  I liked how hers turned out, so thought I'd try it, too (although I did use two coats).


Then I let it dry overnight, just to be safe.  The next morning, I washed and dried it and it was ready to wear!

Bribing him to take pictures by
letting him hold trucks.  Fitting.
I think he likes it!

His favorites:  "Een" (Lightning McQueen),
"Da Da" (Chuck), and "Moo Moo" (Boomer)
Guess it won't be fitting him next February.  Who knew that my 21-month-old could fit into a 3T??  Big boy!

About to try it on.
As you can see, "Mama's" SUV is strategically placed... as is "Daddy's" pickup.

And up close.
The only thing I wish I'd done differently was white paint.  Oh well, guess I'll just have to make him another one! ;)

Yeah... I'm pretty much obsessed with these shapes.  My mind is spinning with all sorts of projects including them... in every medium. :/ I also downloaded Echo Park's cute train shape (which Gabriel also loves).

Uh oh.

Tuesday, February 14, 2012

Happy Valentine's Day!

Some of the most beautiful words to describe love:

Sonnet 116
Let me not to the marriage of true minds
Admit impediments. Love is not love
Which alters when it alteration finds,
Or bends with the remover to remove.
O no, it is an ever-fixèd mark
That looks on tempests and is never shaken;
It is the star to every wand'ring bark,
Whose worth's unknown, although his height be taken.
Love's not Time's fool, though rosy lips and cheeks
Within his bending sickle's compass come;
Love alters not with his brief hours and weeks,
But bears it out even to the edge of doom.
If this be error and upon me proved,
I never writ, nor no man ever loved.

- William Shakespeare

Happy Valentine's Day!

Monday, February 13, 2012

The Pinterest Challenge

I'm participating in The Pinterest Challenge with my Ruffle Butt Onesies!
Be awesome followers and vote for me?  Thanks! :)

The Pinterest Challenge

(To vote, click the star above my entry.  Use CMMD-F or CTRL-F to search for the title "Ruffle Butt Onesies.")

Thursday, February 09, 2012

Cranberry Muffins

I posted on Facebook a while ago about making cranberry muffins.  I got requests for the recipe and fully intended to post it before Christmas (because cranberries are kind of Christmas-y), but then Hallie Lou made her appearance and I... kind of fell off the blogosphere.

SO... I decided to share them again for Valentine's Day, since they're, you know... red and all. ;) I even baked them in heart-shaped muffin tins.  How cute and Valentine-y!


You can use fresh or frozen cranberries but, since fresh ones aren't in season, I'd recommend the frozen ones.  I found my frozen berries at Central Market; my local grocery didn't have them.  Seriously couldn't tell the difference!

(Actually, the recipe calls for partridgeberries [lingonberries], so if you're lucky and live in Canada, you should definitely use them rather than cranberries if you can find them!)


Start by creaming the butter and sugar.  This is my favorite part of baking. I always like to sample... yum!


Add egg, vanilla, milk, baking powder, and salt to your buttery-sugary blend.

With flour mixed in.
Then, mix in the flour.  My mom always did two parts white flour and one part whole wheat, but you can use all white (or all wheat) if you like.


Pour in the berries and fold until incorporated.


Mmm!


And the finished product.  Look how cute they are!  And yummy, too.  I am not ashamed to say that I could eat a whole batch of these babies in a few days.

Hey, cranberries are healthy... and they're made with a little wheat flour, right? ;)


Cranberry Muffins Recipe

1/3 cup butter
1 cup sugar
1 egg
1 teaspoon vanilla
3/4 cup milk
2 teaspoons baking powder
1/4 teaspoon salt
1 1/2 cups white flour
3/4 cup wheat flour

1.  Preheat oven to 350. Cream butter and sugar.

2. Mix in egg vanilla, milk, baking powder, and salt.

3. Stir in flour until blended.

4. Fold in berries until incorporated.

5. Fill muffin tins 2/3 of the way.  Bake for 20 minutes.

Tip:  reserve some berries to add in once you start getting to the bottom of the bowl.  If you don't, you might end up with some berry-less muffins!

Saturday, February 04, 2012

Ruffle Butt Onesies!

So I'm FINALLY getting around to revealing the project I've been working on.  Three cheers for me!

I made these absolutely adorable personalized onesies!


Side note:  my autocorrect keeps wanting to change "onesies" to "onuses." What the heck are onuses?  Do I even want to know??

Anyway...

I was a hostess for my sister-in-law's baby shower this past weekend.  One of my favorite items from my son's baby shower was a set of personalized onesies, so I decided to make some for my little niece, Faith.  (Ahh!  I can't believe I'm going to be an auntie!)

I had planned everything out how I wanted them to look, following this Silhouette/appliqué tutorial from Jen @ My Own Road.

And then, I came across the ruffle butt onesies on Pinterest.

Can we say "OH. MY. GOODNESS"?

Immediately, I was obsessed!

I had planned on doing four, but they took me a lot longer to finish than I'd originally anticipated.  So I just did three.  I don't think they could have turned out better!

Apologies for the weird angled pics.  I forgot to snap
pictures of them until they were already hanging up.

I used my Silhouette to cut out the appliqués from fabric, which already had fusible interfacing ironed on. Then I ironed the cutouts to the onesies.

After I had them on, I applied some fray check, just to cut down on the fraying and then I straight-stitched them on.  I wanted them to fray a little (my sister-in-law likes the shabby-chic stuff), but I didn't want too much!

Note to self (and anyone else who cares):
Gingham frays like nobody's business!
I cut out my ruffles with pinking shears and applied fray check to the edges.  Then I followed the tutorial for sewing them on.

After washing the onesies, two of the ruffles started coming off.  GASP.  I guess my backstitching wasn't holding too well, even though I used a very gentle cycle!  SO... I re-sewed them and then went off to Walmart to get some liquid stitch, which was applied to the undersides of the ruffles for added support.

I also added a bit of the liquid stitch to the undersides of the appliqués for the same reason (and I used it to put the button on the last one... the needle wouldn't go through all the layers of ribbon). 

Yes, I know the ruffles are in the wrong order on this one.
It was the last one and I was sewing around midnight. :|
Anyway!  I just love how they turned out!  Apparently everyone else did, too, because I was asked numerous times if I had an Etsy shop or if I would take orders.  Ha!

First things first:  I need to make some for Hallie! :)

Thursday, January 26, 2012

Sneaky Peeky

I've been a busy mama working on my first Silhouette/sewing machine project.

I think I'm obsessed. ;)

The project isn't finished yet.  I've had to figure out my machines as I go... which has been fun, but time consuming.

Additionally, I keep forgetting to get things.  Like pinking shears.  I thought to myself, "I don't need those for this project; I'll get them later."  You know, to avoid spending a bunch of money right off the bat.

Well, as it turns out, I do need them. :|

So, I'll be going out tomorrow to get them and hopefully finishing my project over the weekend.

I'm so excited to share it with you guys... but for now, I'll leave you with this sneak peek!

Enjoy!

Tuesday, January 17, 2012

Shampoo Free

I have to say that I am intrigued by the idea of not using shampoo.

Enough so to want to try it.

I came across this idea while browsing Pinterest one day.  Actually, I found a link to natural face cleansing, which I've started (and LOVE).  Linked from that post was the one about going off shampoo.

The idea is that shampoo gets rid of the oil that your scalp makes.  And now you're thinking, "Well, duh!"  BUT... that oil is good for you.  It protects your skin and keeps it from drying out.

It's like a never-ending cycle:  you wash your hair to get rid of the oil, but your scalp responds by creating more oil.  The more you wash, the more oil is produced.  I'm simplifying it a lot, but if you're interested in more information, read Tsh's original blog about it here.

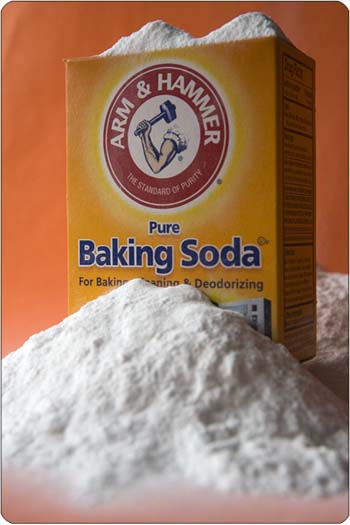
With this natural shampoo-free method, you use baking soda and water to cleanse your scalp.

Baking soda!

Instead of stripping your scalp of the oil it works so hard to create, baking soda only removes the dirt and sweat.  It takes a few weeks, but gradually your scalp will get used to not having to produce as much oil and it'll only make what is needed.

Tsh actually has some other great suggestions for all natural beauty products.  Like using lanolin as lip balm?  Who knew??  And coconut oil as lotion or moisturizer?  I'm in awe.

I'm all about all-natural stuff.  Ask anyone!  And when you can do all natural and save money?!  Count me in!!

Anyway.  I'm way excited about trying out this new method of hair care.  I would have already switched over, but for the fact that I had just bought a new bottle of shampoo before I found the idea. :| Lame, right?  And when you consider that I only wash my hair 2-ish times a week, this stuff is lasting for.ev.er!

I'm contemplating giving my shampoo to Drew when he runs out so that I can switch.  Then when we're completely out of shampoo, I'm going to see if he'll switch with me.

We'll see. ;)

I'll keep y'all updated as the year progresses!


Friday, January 13, 2012

Goals for the New Year

So my post is two weeks late.  I was out of town for Christmas/New Year's and am just now getting back into the swing of life at home.  Don't judge. ;)

Last year, my only resolution was a reading list.  I read most of the books on it, so I'm quite proud of myself.  I think the only one I haven't finished is Jane Eyre... mostly because we moved when I was half-way through and I just kept forgetting to pick it back up. :/ It will get finished eventually...

But Drew and I made a couples' resolution apart from any personal resolution that we might make on our own.  Stop arguing.  And I like to think we did a pretty good job with it.

We still have fights and, yes, even the occasional argument.  However, I like to think we've banished the argumentative spirit from our home.  It's been a process that hasn't been perfected yet, but we're still working on it.

We still disagree.  A lot.  But we have learned that there are better, more productive ways of resolving our conflicts.  We talk.  We try not to get upset or angry when we do.

I won't lie.  It's still hard.  We are argumentative people.  I know that I still get in moods where I disagree with everything that Drew says.  (Drew calls them "contrary moods.")  But we are working, striving.

And we are succeeding, slowly but surely. :)

This year, I've decided to set some goals for myself.  Not resolutions, mind you.  Goals. The difference?  Resolutions are vague and usually too lofty to achieve.  Goals... well, they're:


SO.  Here are a few of my 2012 Goals:
- Go 'poo free... for so many reasons.
- Read a daily devotional book for moms.
- Fully decorate my house.
- Blog more, starting with once a week!- Craft (with my new sewing machine and Silhouette Cameo)!  This is broken down into more specific goals in my head... like make clothes for my kids, make gifts for my family, make custom decor for my house, et cetera.

I probably have more, but I'm running out of time.  There is lunch to be made for my hungry boy!  More details on these goals and more to follow soon! :)

LinkWithin

Related Posts Plugin for WordPress, Blogger...